Still Lifes 3 – Using the Macro mode

Let’s try taking pictures of pretty fashion accessories. Apart from wearing them, you can also take pictures of your favorite fashion accessories.    

phot courses

Still Lifes 3 – Using the Macro mode

Let’s try taking pictures of pretty fashion accessories. Apart from wearing them, you can also take pictures of your favorite fashion accessories — a handmade necklace or that special ring you received as a present.

Use the Macro mode to take pictures of small objects
When taking pictures of small accessories, it is important to take an enlarged picture to really bring out their presence. Small objects will normally be out of focus if you bring the camera too close to them. Instead, you can use the macro function to get larger, in-focus pictures.
The subject will appear larger the closer you bring the camera; but if you get too close, the picture will be out of focus. With the macro function you can take pictures of small subjects getting closer than usual. When you use the Super Macro mode, you can get even closer. Using this function you can get not only pictures where your jewelry fills out the whole picture, but also magnify just one interesting part. So get creative and try different pictures.

Compare the difference between normal and macro shooting

   
  Normal shooting: Macro off Super Macro shooting

Useful things to remember

  • Depending on the model, when you set the camera to Super Macro mode, the picture may be out of focus at normal distances. For normal shooting turn off the macro function.
  • In Super Macro mode the zoom will be at wide-angle. Note that in this zoom position subjects around the periphery of the screen may appear slightly distorted.
  • Macro shooting allows you to take a close-up of the subject, but be careful since camera blur is more likely to occur.

Still Lifes 4 – Using the Macro mode

You may want to take and keep pictures of your favorite gadgets and fashion accessories. But, especially with small jewelry, it is difficult to get the right close-up picture.    

Photo courses

Still Lifes 4 – Using the Macro mode

You may want to take and keep pictures of your favorite gadgets and fashion accessories. But, especially with small jewelry, it is difficult to get the right close-up picture using the zoom or even using the normal macro function. In such case, try using the Super Macro function.

Use the Super Macro mode to take pictures of small objects

With the Super Macro mode, you can get as close as a few centimeters to the subject but you cannot use the zoom or flash. Since camera blur is more likely to occur, stabilize the camera and use a desk lamp to illuminate the subject.
The macro mode is useful to take enlarged close-up pictures of small subjects. There are two types of macro – Macro and Super Macro mode. In macro mode you can use the zoom to adjust the magnification, but if the subject is too small it may not appear larger even with the zoom at telephoto. With the Super Macro mode, you can get as close as a few centimeters to the subject. Keep in mind that even very small movements of the camera will result in blur, so stabilize the camera.


An idea of the setting of the picture
Minimal distance to the subject using
Super Macro mode
· µ 720SW, µ 770SW, µ 750 and
similar cameras — 3 cm.
· SP-550UZ — 1 cm.

Compare the difference between macro and Super Macro

     
Zoom at telephoto in normal
macro mode
Close-up using Super Macro mode

Useful things to remember

  • The closer you get and the more you enlarge the subject, the more noticeable blur will be. Stabilize the camera by using a tripod.
  • If after stabilizing the camera, you find you cannot focus precisely on the point you want, set the AF mode to [SPOT] or [AREA]. You can assure the camera will focus on an exact point by placing the AF target mark over it.
  • If an unwanted shadow is falling over your subject, use a drawing paper or a similar white sheet of paper to reflect some of the light from the window onto your subject in order to reduce the shadow.

Still Lifes 5 – Using the SCENE mode

When taking pictures of objects in indoor exhibition halls, the use of the flash can be a nuisance.    

Foto kurzy

Still Lifes 5 – Using the SCENE mode

When taking pictures of objects in indoor exhibition halls, the use of the flash can be a nuisance. The operation sounds of the camera can be bothersome as well. In such cases, use the [SCENE] mode [MUSEUM] to take the pictures.

Avoid disturbing others — Use the [MUSEUM] mode
In this mode, the flash is set to flash off, and the operation sounds of the camera are muted. However, the ISO is not as high as in [INDOOR] or [AVAILABLE LIGHT] mode so be aware of camera blur.

Most museums and exhibition halls prohibit the use of cameras, but there are some exceptions. Even when you are allowed to take pictures, you do not want to disturb the people around you. You can turn off the flash and the camera’s operation sounds separately, but you can also do so at once by setting the [MUSEUM] mode. In this mode even when focus is achieved the camera will not beep, so remember to check if the AF confirmation mark on the monitor is lit.


An idea of the setting of the picture
Indoor conditions: The only light source
is the incandescent lamp or chandelier.
Without the flash blur is more likely to
occur.

Compare the effects of [MUSEUM] mode

     
Picture taken in Program Auto
(P) mode: The flash fired but did
not reach far enough.
Picture taken in [MUSEUM]
mode: The ISO sensitivity will be
set higher without hurting the
picture quality.

Useful things to remember

  • In [MUSEUM] mode, the ISO will not be as high as in [INDOOR] or [AVAILABLE LIGHT] mode. If there is not enough light, you will need to stabilize the camera to avoid camera blur.
  • With models that feature the image stabilizer function (CCD-shift image stabilization), such as the µ 750, this function can be effective for taking pictures in dimly lit places without affecting picture quality.

Cakes – Using the SCENE mode

Cakes and desserts on display at cafes or pastry shops can be as tempting and pleasing on the eye, no less than to the taste.    

Photo courses

Cakes – Using the SCENE mode

Cakes and desserts on display at cafes or pastry shops can be gorgeous and pleasing to the eye no less than to the taste. However many people have experienced taking pictures of a cake that looks delicious only to end up with not so appetising pictures. If the picture is not right, even if you show it around, it will fail to convey the deliciousness of the food. Try using the [SCENE] modes.

Set [SCENE] to [CUISINE]
[CUISINE], one of the [SCENE] modes, is very convenient for taking pictures of cakes and desserts. Settings are adjusted to really bring out the colors of the food and macro mode is used automatically, so you can get close to the subject to take the picture. Thanks to the slightly stronger colors it is much easier to take mouth-watering pictures of food and cakes.

By setting the [SCENE] mode to [CUISINE] the macro mode and color scheme are automatically set. Try getting as close as possible to the food to take the picture. The flash is usually set to [AUTO] so don’t forget to set it to [ (Flash off)]. In most cases, when you take pictures of food using the built-in flash, the food will not appear very tasty in the picture. Also note that food will look more delicious in the picture if the picture is taken slightly brighter than in real life. Try getting a brighter picture by adjusting the exposure compensation towards the [+].

Compare the effects of the different shooting modes


Try using exposure compensation in addition to the [SCENE] mode [CUISINE]


Useful things to remember

  • If you frame the picture so that a small part of the plate is left out of the picture instead of taking the whole full plate, the picture will be fancier and more attractive.
  • If the cake or dessert is very small, it may not appear large enough in macro mode. Try using super macro mode. The flash is automatically set to flash off.
  • When the flash is set to [ (Flash off)], blur is more likely to occur. Use a higher ISO sensitivity to avoid blur.

Girl with Apples

The photograph I would like to tell you about may seem ordinary to some of you, but for one girl it meant a major change in her life. I took this photograph ten years ago in the town of Baška on the island of Krk off the Adriatic coast.

Girl with Apples

Between 1995 and 2002 I lived in Prague, where I took refuge after the war which had tormented a beautiful country. There I also searched for work as a freelance photographer because I couldn’t find a job teaching German, which had been my profession in the former Yugoslavia. I visited one Prague agency to apply for a photography job; they asked me if I could show them my portfolio. I showed them mainly my black and white photographs of people and life as it had been around me. When they saw this particular photograph (the girl with apples), they stopped and stared at it as if it were a miracle of some kind. I had no idea what was going on at that moment. They told me to immediately make a call to the girl’s mother and tell the girl to go to Vienna at once (where the headquarters of the Prague branch office was located) for test shooting, that they would pay for everything and that her mother should come, too. And so it happened. I called the girl’s mother the same day and the following day they left for Vienna. The shooting was more than successful, and, in the end, the girl (Dijana) was asked to leave straight away to Istanbul for a fashion show, and they wanted her to be in more and more photo shoots.

At the time, she couldn’t because she still had to attend school but it didn’t take long and things took a fast turn. Dijana took off in the world based on one photograph that I had showed to someone a thousand kilometers from her home and for an entirely different purpose. I followed her later progress, and indeed, she became a successful top model working in fashion capitals all over the world, places like London, Milan, Paris, and New York. To this day, I feel good whenever I think about it.

Stanko Abadzic

Still Lifes 1 – Using the SCENE mode

When shooting table-top pictures indoors you can take your time changing the location or the position of the subject until you get that perfect picture you have in mind.    

Photo courses

Still Lifes 1 – Using the SCENE mode

There are many occasions when you want to take still lifes, for example when shooting a picture for an auction site on the internet. Since it is a picture of a product, you want to take a picture that is as attractive and as close to reality as possible. When the picture is different from real life, the charm of the object may be lost in the picture. In most cases still life shots are taken indoors. You will need good lighting but if you use the camera’s built-in flash the shadows can be too hard and the results may not be so good.

Set [SCENE] to [AUCTION]
When you use the flash, the shadows can be too hard and the shape and color of the subject as well as its material texture may not come through very well. Try using a desktop lamp or a similar source of light to avoid hard shadows in the picture. In [AUCTION] mode 3 pictures are taken at different exposure levels. You can display them and select the picture you like best. The image size is automatically set to a smaller size, but it is sufficient for uploading to an internet auction site.


Compare the effects of different values of exposure compensation


From the left: exposure compensation at +0.3, +0.7 and +1.0

Useful things to remember

  • Depending on the light source you use, the colors may not appear natural. Adjust the white balance to match the light source.
  • If your camera model does not have the [AUCTION] mode, set the flash mode to flash off. If your camera has it, try setting the [DRIVE] mode to auto bracketing (BKT).
  • Even using a light source, indoor light conditions are seldom as bright as when shooting outdoors. Stabilize the camera by using a tripod or other similar equipment.

Still Lifes 2 – Using Exposure Compensation

When shooting table-top pictures indoors you can take your time changing the location or the position of the subject until you get that perfect picture you have in mind.    

Photo courses

Still Lifes 2 – Using Exposure Compensation

Everything is included in the frame resulting in an ordinary, featureless pictureFor table-top pictures, though it depends on the subject, you can get a lighter, fresher look by compensating the exposure towards the [+]. Take several shots compensating the exposure to get different brightness levels. In such cases, you can try using the auto bracketing function (BKT) if your camera has it.

Compare the effects of different exposure compensation values

   
No exposure compensation Exposure compensation at +0.7
 
Exposure compensation at +1.3 Everything is included in the frame resulting in
an ordinary, featureless picture

How to Photograph a Boeing

Just as a motorbike is sometimes a motorcycle or tunes are music, in shooting there are also moments, when shooting seems more like photographing. By this I mean moments that are bound not to occur again in the near future and thus mere words do not suffice. True, I am primarily a fashion and commercial photographer but I just could not say no to this photography boon.

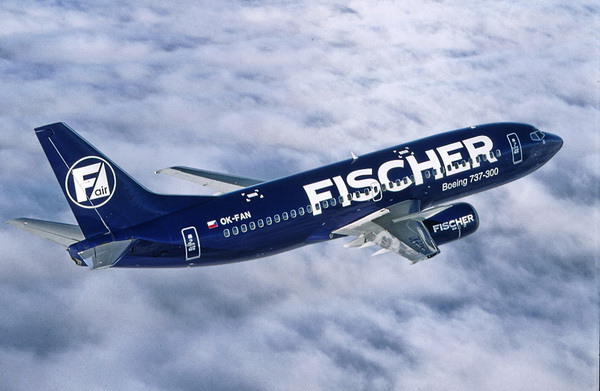
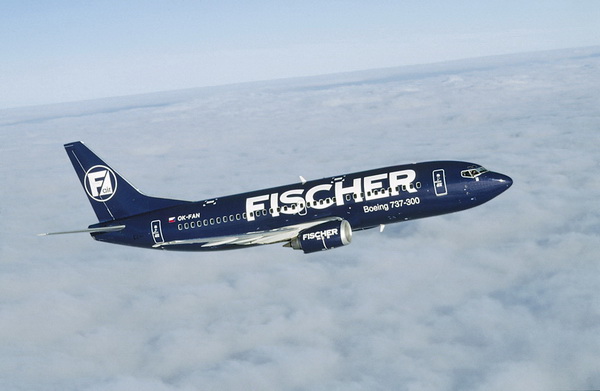
It all started a few years ago somewhere on the island of Ibiza during a work conversation with the owner of the once very successful travel agency Václav Fischer; I ran across a photograph that no airline should lack—an airplane in the clouds, real ones, unretouched by computers. Such a photograph is as symbolic for an airline as a photograph of a shiny car standing on the edge of a cliff at sunset is for any car manufacturer. I had this realization immediately upon my return and I wasn’t sure which way to go. After many emails amongst FISCHER AIR, Aero Vodochody, various air authorities and Mr. Fischer, the whole production was ready to start less than a month after the idea was born. But let’s get back to the beginning.

Boeing

Before I start though, I will answer one question in advance. Many people have asked why we didn’t hire a specialist photographer. Yes, we could have, there even is one such photographer here and perhaps he doesn’t like me now, but try to step into my shoes. Models, supermodels, topmodels or submodels, wouldn’t you feel like getting away for a while, especially into the clouds? As Fischer’s main photographer at the time, I decided that I would assign this task to myself and that I would prepare for it personally.

The first question was how, where, and from what vantage point can such a photograph be taken. My first idea, which involved a second Boeing, was very naïve. Not only for the difficulties with maneuvering such a huge aircraft, the price of fuel, and limited outward visibility, but mainly because a much more professional method existed, indeed more interesting for the photographer, though a little uncomfortable. This method is called an air fighter, or more precisely, an Albatros L 59 training air fighter. This proved the most ideal companion for this type of photography. Whereas negotiations took place between Fischer Air and Aero Vodochody–the company that offered the most professional solutions–I attended a special course to try to understand why it isn’t a good idea to fire off the cabin cover while in the air, or, for that matter, to look at anything, even dare to touch anything.

The training took place two weeks before the production itself, and essentially it was sufficient, unlike elementary school, for me to finally comprehend that what you learn at the bottom, you’ll appreciate knowing twice as much once in the air. But I could not have imagined that I would HAVE to look for anything. Just to illustrate, ejection takes four tenths of a second and the g-force that you experience is very similar to the pressure that Mr. Bean sometimes exerts on his face as well as the faces of many of his television viewers.

But let’s get back to the preparations. I don’t have to remind you that we still photographed on film back then; after all it’s only been ten years. The biggest problem was how to mount the second reserve camera body using a bracket made specifically for this occasion, one which I insisted on having on board. In the end, we found a spot in the dashboard, through which I partially saw the pilot, who was sitting in front of me in place of the test pilot. Yes, the danger the whole flight was that for my better outward view, the pilot was sitting in the front position, which is assigned to the test pilot during training. This implies that if I touched anything in the back, we would both laugh till we dropped; literally.

Two weeks before the actual date, all the conditions for the concerned parties, including rewards and insurance, were agreed upon. The length and direction of the route were devised and the essential permits from respective authorities were signed. The airplane was specially prepared for this occasion and could not carry even a single passenger on board apart from the pilots. In the cabin of our L 59 Albatros it was much easier. Other than the pilot, myself and my two cameras, there was only room for the flight schedule and a hundred grams of fear under the seat on each side. Our crew took off with a ten-minute head start exactly at 9:37 AM. After a few minutes, during which I half-fainted and woke up again in turns (even though I had spent hundreds of hours in the air in commercial planes), we came through the clouds, where we moved according to the instructions of the control tower and waited for it to connect us with the ‘bluebird’. The Fischer Air Boeing 737 took off from the old airport at Prague Ruzyně ten minutes after we had and due to its size, took it a little longer to climb up to our altitude. It eventually emerged on our left. Both planes were navigated from the control tower so that it would be possible to maneuver and change directions even in the air. Both pilots naturally communicated with each other and I was connected to the intercom, to hear instructions in case of any changes.

I think that at the moment I realized where I actually was began the most exciting shoot of my life. Only in the air did I realize the feeling of space around me. I felt as though in the largest studio in the world while giving instructions that I wanted the Boeing on the left, then on the right, downsun or upsun or from below. The cabin of the fighter jet enforced this even further, because I felt as if in an open space. It was a moment where it was possible to forget about the problems of the moment and take the most of the given situation.

Boeing

At the beginning, I was faced with the problem of choosing suitable lenses to carry with me and which to leave on the ground. The possibilities allowed me two ‘bodies’ and two lenses. Due to security factors, changing lenses was almost impossible; this is why I even had to practice changing film on a flight simulator with straps. After tests at the airport I decided on AF Nikor 85 mm 1:1.8 and „D“ 28 – with 70 as the second choice. A relatively simple configuration, as many professionals may object, but there really was no space for a long lens and you know how sometimes less is more. Regarding films, dia material was supplied by KODAK with 100 SW and S Chrom films and a reserve negative by FUJI for professionals of the same sensitivity. I am not sure if today that this tells anyone anything but I had to state it. I wasn’t worried about the light. It was very constant and even though I had tried to measure it straight from the cabin with a light meter due to an excessive presence of glare, in the end I relied more on the built-in measure of Nikon F 90 (instead of the Nikon F5 that had stayed at home due to its weight; the measure of the 90 however proved excellent). I set the second body of Nikon F4 according to the measures of the 90. The hardest nut to crack turned out to be glares, despite the use of a polarization filter. I had anticipated this situation and in my jumpsuit pocket I had smuggled in a mini bounce, which I used as a light shield. I had about thirty minutes for all the ‘fun’ which, thanks to the patience of the crews, extended for a whole hour. I exposed about eight to ten cine-film rolls, which was an extreme number taking into account that the last time I had felt so ‘relaxed’ was while bungee jumping and on a rollercoaster. For today’s digital photographer, it probably would be woefully little material but that‘s how it was back then. The last shots from a ten-meter distance were, so to speak, in the pocket and so we could afford a greeting in the cabin.

The return to earth was in the name of attempting to win the courage badge. I survived the spiral one hundred meters above the airport head down and thanked everyone politely. I took the smiles of the technicians after landing due to my pale face as the cherry on the top. May I add one more note? It is sometimes said that pilots are bigheaded hot shots; I would like to state that they have a reason to be and once again I would like to kindly thank them. In my next life, I would like to be a pilot, or at least carry a helmet for one.

Adolf Zika

New Year's Eve

The second edition of Photo Topics logically relates to the end of the holidays that come at the end of each year. New Year’s Eve and the coming of the New Year as such can have a different character for each and every one of us. Some like it full of joy, some like it larger than life, some like it quiet, and some perhaps don’t even have a chance to choose. Fortunately, we had the possibility to choose and we bring you a collection of photographs taken by the members of our WoL family who experienced this specific day in various different places and in various different ways.

Paja, Student, Portugal

Alena, Unemployed, Czech Republic

Jan Watzek, Student, Czech Republic

Milan Rejholec, Student, Czech Republic

Tomas Loewy, Photographer, Florida

lamik, Freelance artist, Slovakia

Juraj Sucharda, Businessperson, Slovakia

Roman Dolecek, Unemployed, Czech Republic

Alena, Unemployed, Czech Republic

Zdeněk Dvořák, Special education needs teacher, Czech Republic

Jan Watzek, Student, Czech Republic

Tomas Loewy, Photographer, Florida

Martina Watzková, Student, Czech Republic

Alena, Unemployed, Czech Republic

Jan Watzek, Student, Czech Republic

lamik, Freelance artist, Slovakia

Milan Rejholec, Student, Czech Republic

Martina Watzková, Student, Czech Republic

Paja, Student, Portugal

Jan Watzek, Student, Czech Republic

Roman Dolecek, Unemployed, Czech Republic

Martina Watzková, Student, Czech Republic

Alena, Unemployed, Czech Republic

lamik, Freelance artist, Slovakia

Zdeněk Dvořák, Special education needs teacher, Czech Republic

Christmas

The section we would like to present to you today is one we have been looking forward to since the very beginning of Week of Life’s existence. Today’s Christmas edition is represented by only three countries but this fact doesn’t take away any of its glory. We all realize that we are just at the beginning and that with the growing number of Week of Life family members, we can expect amazing contributions to this section and that these contributions will become more and more interesting as the topics get wittier and perhaps even absurd at times. The sole purpose and message of this new section is of course comparison. Comparison of the way one person lives and experiences something, which another person in a place more or less distant may live and experience quite differently. Waiting for new topics, which you can suggest at contact@weekoflife.com, fills us with expectation and the well-known photographic excitement. We all brush our teeth in the morning, we all watch TV, we all have fun, drive cars or ride in buses, we cook, we laugh, we enjoy sports, we get bored. We simply live our lives yet each and every one of us does it slightly differently. And this SLIGHT DIFFERENCE is, and certainly also will be in the future, very entertaining to compare. Today, we have no choice but to look forward to next year, to see how many representatives of various cultures from countries of the entire world will contribute to the Christmas section. So enjoy it, compare your habits, customs, and everydayness.

Petr Kleiner, Manager, Czech Republic

Adolf Zika, Photographer, Czech Republic

Zdeněk Dvořák, Special education needs teacher, Czech Republic

František Ortmann, Photographer, Czech Republic

Il Em, None, Slovakia

Jiří Hrdlička, Technician, Czech Republic

Marja Palosulo, Architect, Sweden

Milan Rejholec, Student, Czech Republic

František Ortmann, Photographer, Czech Republic

Pavlína Jandová, Parental leave, Czech Republic

Petr Kleiner, Manager, Czech Republic

Petr Kubečka, Manager, Czech Republic

Roman Doleček, Unemployed, Czech Republic

Snow, Student, Czech Republic

Zdeněk Dvořák, Special education needs teacher, Czech Republic

Adolf Zika, Photographer, Czech Republic

Zdeněk Dvořák, Special education needs teacher, Czech Republic

František Ortmann, Photographer, Czech Republic

Il Em, None, Slovakia

Karel Vaněk, Technician, Czech Republic

Marja Palosuo, Architect, Sweden

Adolf Zika, Photographer, Czech Republic

Pavlína Jandová, Parental leave, Czech Republic

Petr Kubečka, Manager, Czech Republic

Pavlína Jandová, Parental leave, Czech Republic

Roman Doleček, Unemployed, Czech Republic

František Ortmann, Photographer, Czech Republic

Zdeněk Dvořák, Special education needs teacher, Czech Republic

Marja Palosuo, Architect, Sweden

Adolf Zika, Photographer, Czech Republic